Garlic Parmesan Cheeseburger Bombs
Garlic Parmesan Cheeseburger Bombs
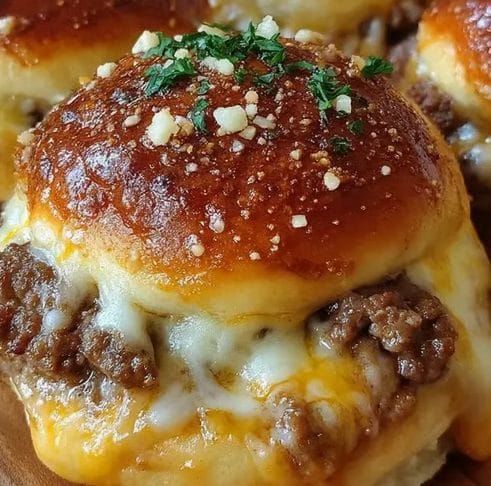
This garlic parmesan cheeseburger bombs recipe transforms the classic burger experience into irresistible pull-apart bites that will have everyone gathering around your kitchen. Each golden bomb delivers that perfect combination of seasoned beef, gooey melted cheese, and buttery garlic flavor wrapped in tender, flaky dough that disappears from your table in minutes. These bite-sized delights pack all the satisfaction of a full cheeseburger into convenient handheld portions that are perfect for parties, game day gatherings, or whenever you want comfort food that feels special.
Why You’ll Love This
Ready in under 30 minutes from start to finish – Perfect for last-minute entertaining or satisfying sudden comfort food cravings
Uses simple ingredients you likely have on hand – No special shopping trips required for impressive results that wow guests
Perfect handheld snacks for parties or game day – No messy eating or awkward plate juggling during social gatherings
Kid friendly but sophisticated enough for adults – Appeals to all ages with familiar flavors presented in exciting new format
Completely customizable with your favorite burger toppings – Add bacon, pickles, or caramelized onions to create your signature version
I created these during a football watch party last season when I wanted something more exciting than regular sliders but just as satisfying. They were such an immediate hit that they’ve become my most requested recipe whenever friends gather at our house, and I love watching people’s faces light up when they bite into that perfect combination of flavors.
Essential Bomb Ingredients
Ground beef: The star protein that creates the authentic burger experience. Use 80/20 blend for best flavor without excess grease
Worcestershire sauce: Adds that classic umami depth that makes burgers taste authentically delicious and restaurant-quality
Sharp cheddar cheese, shredded: Use cheddar for classic flavor or mozzarella for extra cheese stretch factor that kids love
Refrigerated biscuit dough: Saves time while creating the perfect golden, flaky exterior that wraps everything beautifully
Butter, melted: Creates that irresistible golden brown color and rich flavor that makes these bombs absolutely irresistible
Fresh garlic, minced: Fresh provides the best aromatic punch, though garlic powder works in a pinch for convenience
Grated parmesan cheese: Adds salty, nutty crust that transforms ordinary bombs into something genuinely special
Basic seasonings: Salt, pepper, garlic powder, and onion powder build essential layers of flavor throughout the filling
Fresh parsley: Optional garnish that adds beautiful color contrast and fresh herbal brightness
Complete Assembly Process
Creating Flavorful Beef Foundation
Cook ground beef in a large skillet over medium-high heat, breaking it into small, uniform crumbles as it cooks for even texture distribution. Continue cooking until no pink color remains throughout, about five to seven minutes total cooking time. Drain excess fat thoroughly using a colander or paper towels to prevent soggy bombs that lose their appealing texture during baking.
Building Perfect Seasoning Profile
Return the drained beef to the skillet and add salt, pepper, garlic powder, onion powder, and Worcestershire sauce, stirring to combine all seasonings thoroughly throughout the meat. Remove from heat and let the mixture cool for about five minutes before adding cheese, otherwise the cheese will melt completely instead of creating those desirable pockets of gooey goodness that make each bite special.
Preparing Cohesive Filling Mixture
Once the beef mixture has cooled slightly, add shredded cheese and mix gently but thoroughly until well distributed. If using additional fillings like crispy bacon crumbles or finely chopped pickles, fold them in carefully at this stage. The finished filling should hold together when pressed but not be so compact that it becomes dense or heavy.
Mastering Bomb Assembly Technique
Flatten each piece of biscuit dough into a circle about three inches in diameter, working gently to avoid tearing the delicate dough. Place one to two tablespoons of the prepared filling in the center of each dough circle, being careful not to overfill. Carefully bring the edges up and around the filling, pinching firmly to seal completely without any gaps. Roll gently between your palms to form smooth, even balls.
Arranging For Optimal Baking
Place each filled bomb seam-side down on a parchment-lined baking sheet, spacing them about two inches apart to allow for proper expansion during baking. The seam must be positioned on the bottom to prevent filling from leaking out and creating messy results that affect both appearance and texture.
Creating Signature Garlic Topping
Combine melted butter and minced fresh garlic in a small bowl, whisking together until well blended and aromatic. Brush this mixture generously over the tops of each bomb, ensuring complete coverage for maximum flavor impact. Sprinkle grated parmesan cheese evenly over each bomb, making sure every surface gets coated for that distinctive nutty, salty crust.
Baking To Golden Perfection
Bake in a preheated 375°F oven for fifteen to eighteen minutes until the tops turn beautifully golden brown and the dough is completely cooked through without any raw spots. The finished bombs should sound hollow when tapped gently, indicating proper doneness throughout.
Adding Final Finishing Touches
Remove from oven and brush with additional garlic butter mixture if desired for extra richness and shine. Sprinkle with freshly chopped parsley for a vibrant pop of color and fresh herbal flavor that brightens the rich, savory bombs. Allow to cool for three to five minutes before serving to prevent burning mouths while maintaining optimal serving temperature.
You Must Know
Each bomb contains approximately 250 calories of pure comfort food satisfaction – Substantial enough to be filling while remaining reasonable for snacking
Can be prepared up to 24 hours ahead and baked when needed – Perfect for stress-free entertaining and advance meal planning
Freeze beautifully after baking for up to three months – Make double batches for convenient future meals and unexpected guests
Creates impressive appetizers that look professionally made – Guests will think you spent hours in the kitchen creating something special
Smart Make-Ahead Strategy
These incredible cheeseburger bombs are perfect for advance planning that makes entertaining completely stress-free and enjoyable. You can prepare them completely up to the baking stage, then cover tightly and refrigerate for up to twenty-four hours without any loss of quality. When ready to serve, simply brush with the garlic butter parmesan mixture and bake as directed, adding two to three minutes to the baking time since they’ll be starting cold from the refrigerator. This flexibility makes them ideal for entertaining when you want to enjoy your guests instead of being stuck in the kitchen.
Creative Flavor Variations
The basic cheeseburger bomb recipe serves as just the beginning for endless creative possibilities that suit different tastes and occasions. Try bacon cheeseburger bombs with crispy crumbled bacon for extra indulgence that meat lovers adore. Pizza bombs filled with pepperoni and mozzarella create a fun Italian-inspired alternative that kids especially love. Breakfast bombs stuffed with scrambled eggs, cheese, and breakfast sausage transform this concept into a portable morning meal. Vegetarian versions using well-seasoned plant-based ground products work surprisingly well and satisfy non-meat eaters.
Perfect Serving Ideas
While these bombs are absolutely delicious on their own, pairing them with complementary dipping sauces takes the experience to exciting new heights. Cool ranch dressing provides refreshing contrast to the savory, rich bombs while adding familiar flavor that everyone recognizes. Spicy mayo brings welcome heat that complements the rich filling without overwhelming the delicate garlic parmesan flavors. Classic burger sauce made with ketchup, mayo, and sweet relish recreates the complete burger experience in dippable form.
Professional Chef Secrets
Always seal the dough completely and place seam-side down – This prevents filling from leaking during baking and creating messy, uneven results
Let the beef mixture cool slightly before adding cheese – This maintains distinct pockets of gooey cheese rather than having it completely melt into the meat
Brush with egg wash before applying garlic butter mixture – Creates the most even, professional-looking golden tops that impress every time
These garlic parmesan cheeseburger bombs represent everything I love about creative comfort food that brings people together around the table. They take familiar flavors that everyone already loves and present them in an exciting format that feels both nostalgic and completely new at the same time. Every time I serve them, I’m reminded that the best recipes are often the ones that make ordinary ingredients feel extraordinary through thoughtful preparation and genuine care.
Recipe FAQs
→ Can I use different types of dough?
Yes! Crescent roll dough, puff pastry, or even homemade bread dough all work great. Just adjust the baking time slightly based on the dough type.
→ How do I prevent the bombs from bursting open?
Make sure to seal the edges really well by pinching firmly, and place them seam-side down on the baking sheet. Don’t overfill them either.
→ Can I make these ahead of time?
Absolutely! Assemble them completely and refrigerate for up to 4 hours, or freeze for up to 3 months. Bake directly from frozen, adding a few extra minutes.
→ What dipping sauces work best?
Ranch, garlic aioli, spicy mayo, ketchup, or even marinara sauce all pair wonderfully. Basically any sauce you’d enjoy with a burger!
→ How do I reheat leftovers?
Reheat in a 350°F oven for 5-8 minutes, or use an air fryer at 350°F for 3-4 minutes to restore the crispy exterior.
→ Can I make these vegetarian?
Sure! Use plant-based ground meat, seasoned mushrooms and beans, or even a mixture of sautéed vegetables with cheese for a delicious veggie version.
Garlic Parmesan Cheeseburger Bombs
Seasoned ground beef and cheese wrapped in flaky dough, brushed with garlic butter and topped with Parmesan for the ultimate bite.
Preparation Time
20 min
Cooking Time
18 min
Overall Time
38 min
Created By: Lily Chen
Category: Party & Snacks
Skill Level: Moderate
Cuisine Type: American
Output: 6 Serves (8-12 bombs)
Dietary Options: ~
Ingredients
→ For the burger filling
1 pound ground beef
Salt, pepper, garlic powder, and onion powder to taste
1 tablespoon Worcestershire sauce
1 cup shredded cheddar or mozzarella cheese
Optional: crispy bacon, pickles, or caramelized onions
→ For the dough wrapping
1 tube refrigerated biscuit or pizza dough, cut into 8-12 circles and flattened
→ For the garlic Parmesan topping
2 tablespoons butter, melted
1 teaspoon minced garlic or garlic powder
2 tablespoons Parmesan cheese, freshly grated
Chopped fresh parsley for garnish (optional)
Steps
In a large skillet, cook your ground beef over medium heat until it’s nicely browned and no longer pink. Drain off any excess fat, then season with salt, pepper, garlic powder, onion powder, and Worcestershire sauce. Let the mixture cool completely, then stir in your shredded cheese until well combined.
Take each piece of dough and flatten it into a circle about 4 inches across. Place 1-2 tablespoons of your cooled burger filling right in the center. Carefully pinch the edges of the dough together to seal completely, then gently roll each one into a smooth ball.
Place your sealed dough balls seam-side down on a parchment-lined baking sheet, leaving some space between each one. Mix your melted butter with minced garlic, then brush this mixture generously over each bomb. Sprinkle the tops with grated Parmesan cheese.
Preheat your oven to 375°F and bake the bombs for 15-18 minutes, or until they’re beautifully golden brown and the dough is cooked through completely.
As soon as they come out of the oven, brush them with any remaining garlic butter and sprinkle with fresh chopped parsley if you’re using it. Serve these incredible bombs warm with your favorite dipping sauces like ranch, garlic aioli, or spicy mayo!
Tips
These bombs are perfect for parties, game day, or any time you want handheld comfort food that’s absolutely irresistible.
You can assemble these completely ahead of time and bake them later for ultimate convenience – perfect for entertaining!
Leftovers freeze beautifully and can be reheated in the oven or air fryer to restore that perfect crispy exterior.
Get creative with variations – add diced jalapeños for heat, swap in Italian sausage, or make breakfast versions with scrambled eggs and bacon.
Make sure your filling is completely cooled before assembling, or the heat will make the dough difficult to work with.
Required Tools
Large skillet
Baking sheet
Parchment paper
Pastry brush
Small bowl for garlic butter
Allergy Information
Always check each ingredient for allergens, and consult a medical professional if unsure.
Nutritional Information (per serving)
These details are shared for general guidance and don’t replace professional advice.


